Introduction
OpenStack is a mature, open-source platform for building private and public clouds. In this post, we’ll take our first deep dive into provisioning OpenStack resources using Terraform.OpenStack automation resources are surprisingly scarce, especially in the context of modern DevOps workflows. This guide aims to fill that gap by walking through a practical hands-on example. We’ll cover several OpenStack components and their interactions. Specifically, you’ll learn how to:
- Configure and authenticate Terraform with the OpenStack provider.
- Create a compute instance and manage associated resources.
- Understand the relationship between OpenStack services and Terraform.
What We Will Build
By the end of this guide, Terraform will provision:
- a compute instance
- a security group allowing SSH access
- an SSH keypair reference
- a block storage volume attached to the instance
The infrastructure will be organized using three Terraform modules:
- security
- compute
- storage
Setup
You can follow along on your local machine or any virtual machine. The only prerequisites are:
- An existing OpenStack deployment.
- Terraform installed on your system.
Once installed, you’re ready to start building your infrastructure as code.
Configuring Terraform for OpenStack
The first step in our project is creating a provider.tf file, which sets up the OpenStack provider and handles
authentication with your private cloud. At a high level, there are two key components:
- Terraform block – defines required providers and versions.
- OpenStack provider block – handles authentication.
Terraform Block
Add the following to your provider.tf:
| |
This ensures Terraform installs the OpenStack provider when you run terraform init. At the time of writing, version
3.4.0 is the latest stable release.
Initialize your project with:
| |
You should see output similar to:
| |
Authentication
Next, add the OpenStack provider block in provider.tf:
| |
We are using Application Credentials instead of a username and password. These credentials are project-scoped and linked to a user, which is why a username isn’t required.
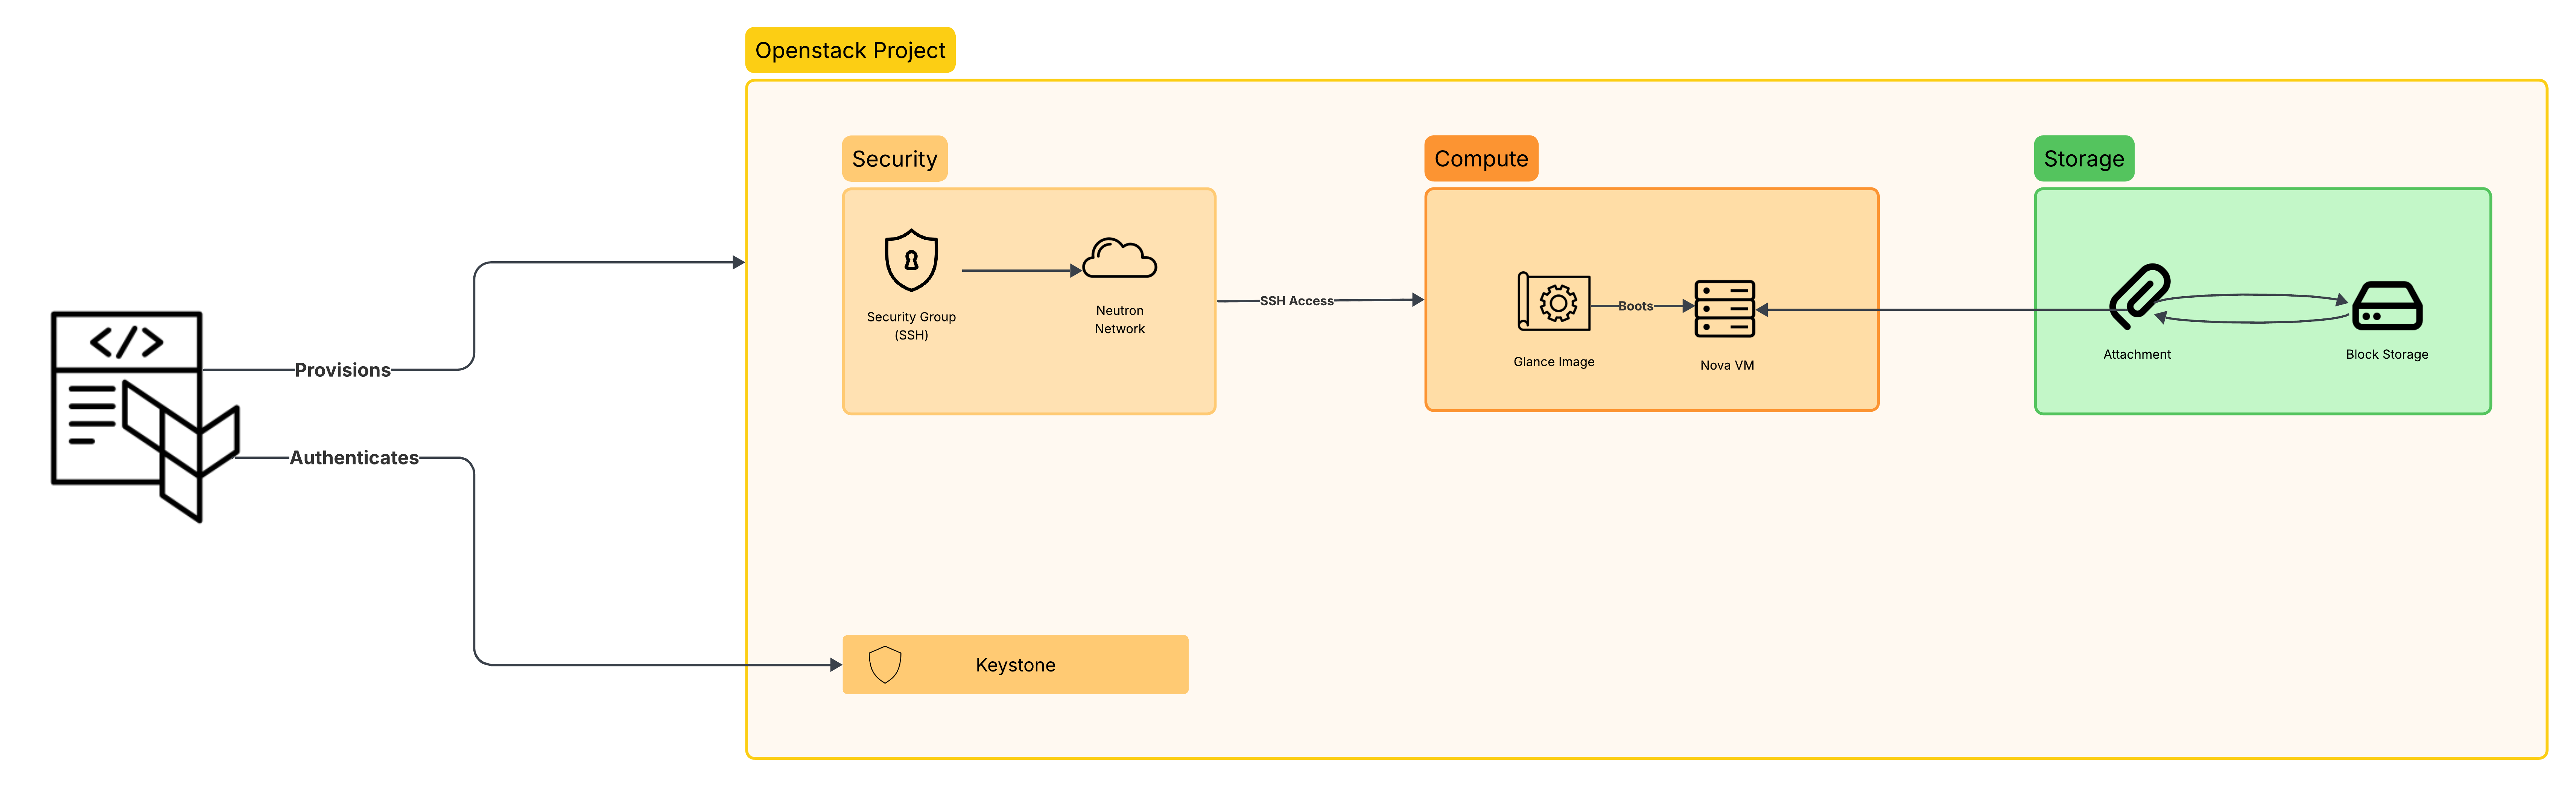
The following diagram illustrates the authentication flow in OpenStack using application credentials:

OpenStack Components for a VM
Creating a single functioning VM in OpenStack requires several components to be in place. At a high level, three major resources are needed:
- Security:
- SSH: Assigns the SSH key to connect to the VM
- Security Group/s: firewall rules to control traffic (SSH, ICMP etc.).
- Block Storage: Additional persistent storage attached to the VM (optional).
- Compute Instance:
- OS Image: The operating system template for the VM.
- Flavor: Defines CPU, RAM, and disk configuration of the VM.
- Network: One or more network interfaces to attach to the VM
Regarding the network, a default one already exists in the project. So there’s no need to provision/create it in Terraform for this example.
Project Structure
Each main component will be implemented as a separate module. We will be covering each of these components as we go.
Security
The security module has no dependencies on other modules, so we create it first. In OpenStack, the Security Groups
consist of two resources:
- The Security Group itself.
- One or more Security Rules.
In Terraform, they would be translated to the following resources:
openstack_networking_secgroup_v2openstack_networking_secgroup_rule_v2
Defining the Security Group
Security Group is probably the simplest resource to create in Terraform, as it only takes two parameters:
namedescription
The code snippet below creates an external_access Security Group, which will later hold the rules to allow external
SSH connections:
| |
All the variables referenced here are defined in the
variables.tffile.
Defining the Security Rules
Now that we have our Security Group defined, we can proceed to create the rules. Every Security Rule is its own separate resource. We only need one rule in our example, so one resource is enough:
| |
Notice the security_group_id parameter that links our rule to the previously created Security Group. This creates an
implicit dependency for Terraform and allows it to know how which resources are dependent on each other.
SSH
The SSH keypair is defined in the security/keypair.tf file as a resource:
| |
The user has to provide the public key file name, and a new key pair will be created inside the project.
Compute
The openstack_compute_instance_v2 resource is responsible for creating one or more OpenStack compute instances. As a
reminder, we need to define the following:
- Flavor
- OS image
- SSH keypair
- Security Group
- Network
This can be done using the code snippet below:
| |
security_groupsis defined as a variable. At this stage it does not yet have a value as it will be provided by the security module. The modules are not aware of one another. This dependency will be resolved later when the modules are connected in the root configuration.
The diagram below illustrates how the compute resources fit into the overall architecture:
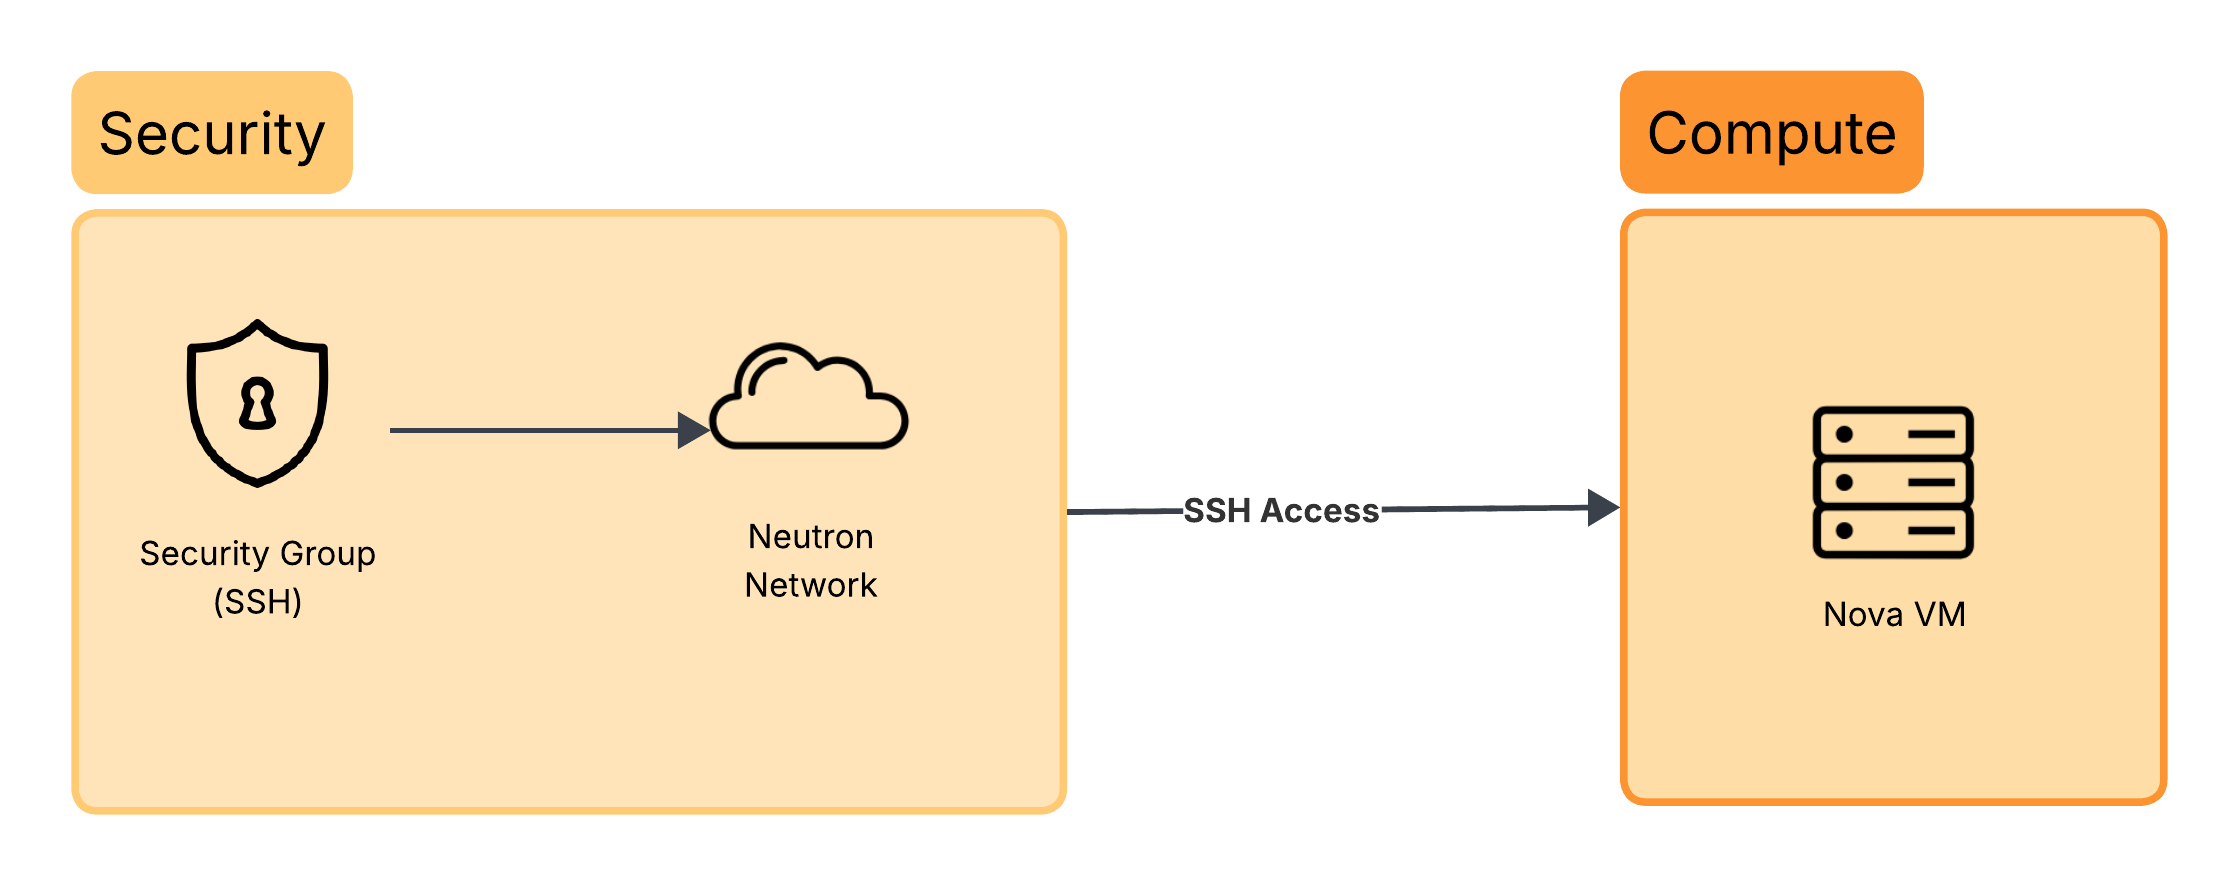
Now onto our storage module.
Storage
The volume is created using openstack_blockstorage_volume_v3:
| |
We only need the above three variables. But there’s still something missing, it is not attached to anything. Right now, the volume just exists in a detached state.
A block storage volume in OpenStack is independent of compute instances. The attachment is handled by the
openstack_compute_volume_attach_v2 resource, which links a volume to a compute instance. This can be done as:
| |
The diagram below helps to visualize the storage module:
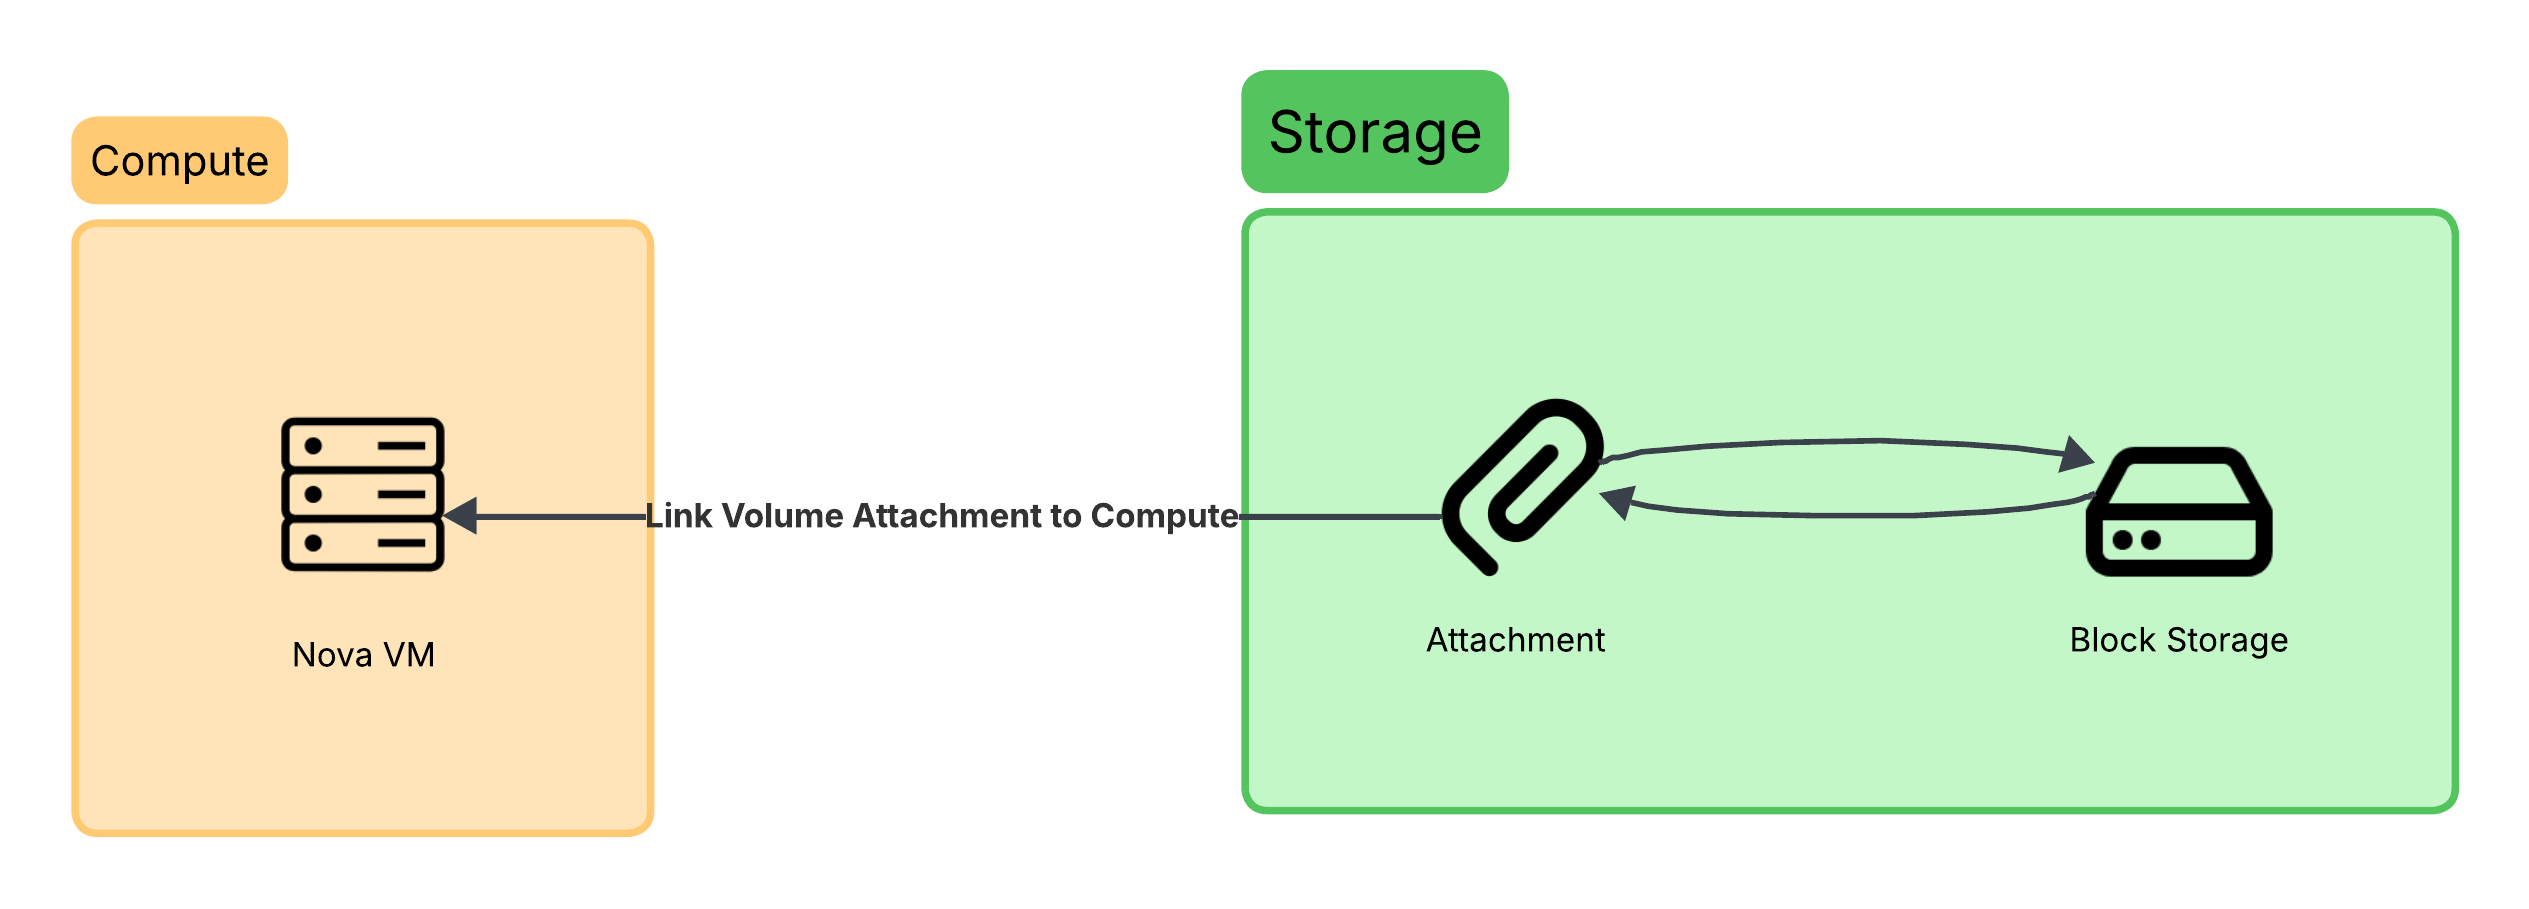
The attachment acts as the bridge between our compute instance and the block storage.
Module Outputs
Each module exposes outputs that can be consumed by other modules. This allows Terraform to automatically build the dependency graph. For example:
| |
These outputs are later referenced in main.tf when connecting modules.
All outputs are purposely defined to be in a JSON format. This makes it easier to consume them programmatically if we ever need to.
Linking the Modules
Right now, the modules exist independently and are unaware of one another. To piece everything together, we create
main.tf file at the root of the project. The main.tf file will act as an entrypoint and ties all modules together:
| |
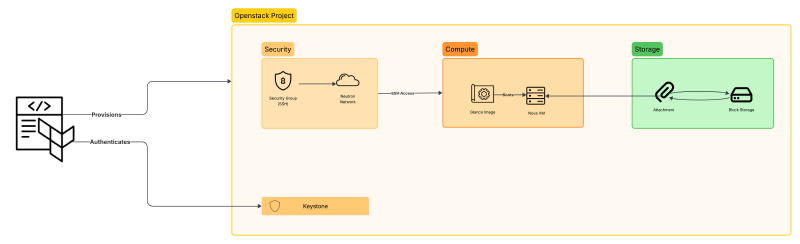
The diagram below gives us a bird’s eye view of the entire architecture that we have so far, showing the relation and interaction between each component:
Terraform Plan and Apply
Now that we finally have everything set, we’re ready to continue with the provisioning and run our first
terraform plan command. Terraform would output all the resources that would be created, modified and/or deleted.
Since this is a new project, we expect to have only additions.
The output is far too long to display here, so only the summary will be shown
You should expect to have:
| |
Review the plan output, check each resource and see if you can relate which resource is to which module. Terraform even tells you this info, for example:
| |
Apply
When all is set and done, we can go ahead and run:
| |
You can review the plan again, and if all’s set, you can go ahead and type yes, and Terraform would start creating the
resources one after the other. In the end, you should get an output similar to this one:
| |
Conclusion
We’ve covered a lot in this post, from the basics of integrating Terraform with the OpenStack provider, to provisioning an OpenStack project and creating independent modules with their own output. There are still plenty of improvements to be made though. For example:
- Credentials are currently stored in plaintext in the
provider.tffile. - Terraform is being executed directly from a local or remote machine instead of a containerized environment.
- There is no CI/CD pipeline in place.
- State management and secret handling are not yet addressed.
We will be covering the topics step by step in future posts, working towards a fully automated, secure and robust Terraform workflow for managing infrastructure in a private OpenStack cloud.
Note: This GitHub repo contains the complete source code used in this post.