
Introduction
In the previous post, we deployed an LLDAP server for centralized user management. The next step is configuring Linux clients so users stored in LLDAP can log in over SSH without creating local accounts.
This client configuration relies on four components:
- SSH for public key authentication
- SSSD (System Security Services Daemon) for LDAP integration and caching
- NSS (Name Service Switch) for user and group resolution
- PAM (Pluggable Authentication Module) for session management and home directory creation
Because this modifies the system authentication stack, even small configuration mistakes can prevent users from logging in. For that reason, the role is designed to be predictable and idempotent.
LLDAP Custom User Attributes
Before getting into the technical details, we need to prepare the LLDAP schema. Log in to the LLDAP server, open the User Schema, and add the custom attributes shown in the image:
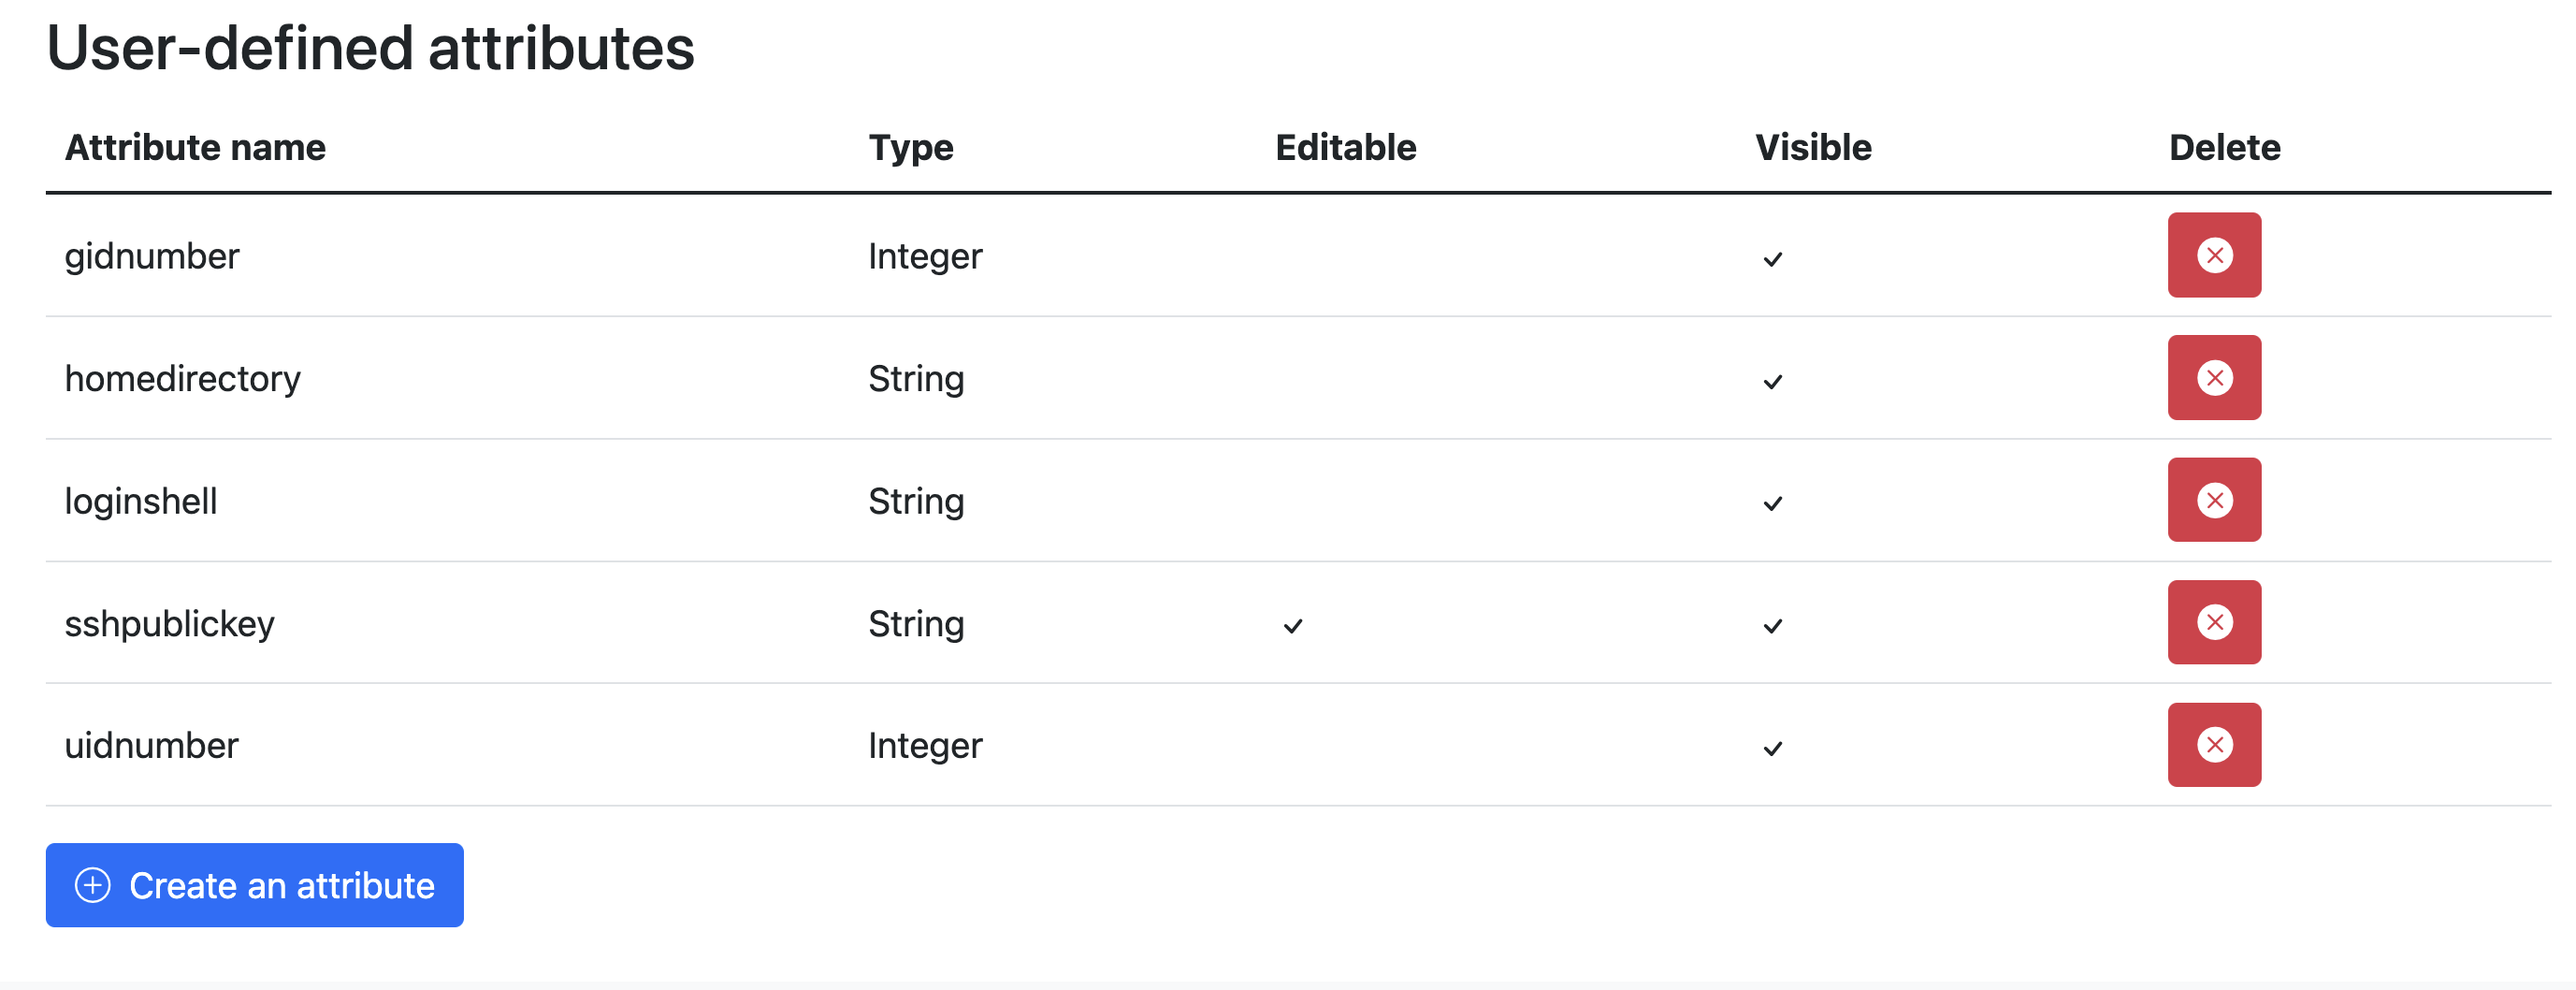
These attributes will later be mapped from LLDAP to the Linux account model.
uidnumberandgidnumberrepresent the numeric UID and GID values expected by Linux. LLDAP uses UUIDs internally by default, so these attributes allow us to map directory users and groups to traditional Linux identities.
Sequence Diagram
Several components participate in LDAP-backed authentication, so it helps to understand how they interact before we start configuring them. Below is the sequence diagram to help us better understand and visualize the flow:
  %%{init: {
  "themeVariables": {
    "fontSize": "28px",
    "actorFontSize": "28px",
    "noteFontSize": "28px",
    "messageFontSize": "28px"
  }
}}%%
sequenceDiagram
    autonumber
    actor User
    participant SSHD as SSHD (VM)
    participant SSSD as SSSD
    participant Cache as SSSD Cache
    participant LDAP as LLDAP
    participant PAM as PAM (pam_mkhomedir)
    User ->> SSHD: SSH login request (username)
    SSHD ->> SSSD: Request user's SSH public key
    SSSD ->> Cache: Check cached LDAP entry

    alt Cache hit and entry is valid
        Cache -->> SSSD: Return cached sshPublicKey
    else Cache miss or cache expired
        SSSD ->> LDAP: Query user (uid=username)
        LDAP -->> SSSD: Return sshPublicKey
        SSSD ->> Cache: Update cache
    end

    SSSD -->> SSHD: Return user's public key
    SSHD ->> User: Send authentication challenge
    User ->> SSHD: Sign challenge with private key

    alt Signature verification succeeds
        SSHD ->> PAM: Open user session
        PAM ->> PAM: Check if home directory exists

        alt Home directory does not exist
            PAM ->> PAM: Create home directory from skeleton
        else Home directory already exists
            Note over PAM: No action required
        end

        PAM -->> SSHD: Session setup complete
        SSHD -->> User: Authentication successful
    else Signature verification fails
        SSHD -->> User: Authentication denied
    end
In a normal SSH scenario, the user connects with a private key, and SSHD verifies it against the local authorized_keys
file stored on the VM. With LDAP, things are different. The authorized keys are centrally stored instead. In our
setup, when a user connects to a VM, SSHD invokes sss_ssh_authorizedkeys, which is a helper utility that will query
SSSD to retrieve the public key of the user.
SSSD first checks whether the entry exists in cache. If there is a cache hit, the user’s public key is returned and the
normal SSH authentication flow proceeds. Otherwise, SSSD sends the request to the LDAP server, retrieves the
authorized_keys entry, and then continues the SSH flow.
Once the user is authenticated, PAM invokes pam_mkhomedir to create the user’s home directory if it does not already
exist. That keeps the full login workflow automated and split across the right layers.
Install Required Packages
With the authentication flow in mind, we can start configuring the client. The first step is installing the required packages:
- sssd: Actual SSSD service and daemon.
- sssd-tools: Contains helper tools such as SSSD cache.
- libnss-sss: NSS module that allows Linux applications (
id,getentetc.) to resolve users and groups through SSSD. - libpam-sss: PAM module that allows PAM to communicate with SSSD.
- ldap-utils: Optional utility that is useful for testing and debugging.
Our Ansible task will take care of this for us:
| |
PAM Configuration
PAM offers a wide set of tools for handling authentication. For this setup, we only use it for session handling. More
specifically, PAM creates the user’s home directory during login. This is done by editing /etc/pam.d/common-session
and adding the line:
| |
pam_mkhomedir automatically creates a user’s home directory on first login using /etc/skel as the template.
Injection of the PAM configuration is handled through this task:
| |
SSH Configuration
Three changes need to be added in /etc/ssh/sshd_config:
| |
AuthorizedKeysCommand tells SSHD to use SSSD for authorized key retrieval. AuthorizedKeysCommandUser nobody tells
SSH which user should run the command to query SSSD. nobody is a low-privilege system account with minimal permissions
and is much
safer than running the command as root.
Another single Ansible task is enough to take care of that:
| |
restart ssh is only notified when the block changes. If the settings are already present, the task is a no-op, which
makes it safe to run repeatedly without breaking the SSH configuration.
NSS Configuration
The default config file for NSS is located at /etc/nsswitch.conf. On Ubuntu, the default configuration is valid out of
the box, without any changes. For completeness, we will provide the default nsswitch.conf:
| |
NSS queries each source in the order listed. In the example above, Linux first checks local files, then the systemd provider, and finally SSSD. If SSSD is reached, it resolves the identity through LDAP.
SSSD Configuration
SSSD is the core of the client configuration because it connects Linux to LDAP. Even small configuration errors can prevent authentication from working.
SSSD Block
| |
services defines which SSSD responder services are enabled. The NSS responder allows Linux applications to resolve
users and groups through SSSD, while the PAM responder handles session setup, including home directory creation through
pam_mkhomedir.
NSS and PAM Blocks
We only need to define the blocks so that SSSD knows they exist. They remain empty:
| |
These blocks rely on the domain/ldap block defined below. They remain empty, and can even be omitted, since there are
no additional configurations to apply.
domain/ldap
The last, and probably most important, section. We need to define:
- Attribute mapping (the custom user and group attributes that we have created through the web UI)
- Provider
- Connection settings
- TLS settings (disabled for this post)
- Bind credentials
- ID mapping and enumeration
| |
Bind Credentials
LLDAP provides the read-only lldap_user_querier account for directory lookups. SSSD uses this account to perform LDAP
searches by binding with a username and password.
Although the credentials are stored in sssd.conf, the file is readable only by root and the account has read-only
permissions. This limits the impact of credential exposure, but the password should still be treated as sensitive.
Ansible Task
First we define the variables that will later be used to render the sssd.conf.j2 template:
| |
Finally, here is the sssd.yml Ansible task to bring it all together for setting up SSSD:
| |
Deployment
All that is left is the playbook that applies the role to the target host:
| |
After running the palybook, we can ssh with our habibi user:
| |
We have not done any setup on the VM itself, and we did not add any local users or hardcode anything specific to the
habibi account. Instead, the VM communicates with the LDAP server when it needs identity data.
If we run the playbook again, it should report 0 changes:
| |
Break-Glass Access
Misconfiguration can lock clients out of LDAP-backed login. For that, it is highly recommended to keep one local
administrative account with sudo access so you can still log in and fix the client if SSSD, PAM, or SSH is broken.
Conclusion
With the client role in place, the VM can use LLDAP for SSH public keys, user identity lookups, and session setup without any local user provisioning. SSHD, SSSD, NSS, and PAM each handle a small part of the flow, but together they give us a repeatable and centrally managed login path.
The Ansible role is available on GitHub.