Introduction
LocalStack is a local cloud development solution that emulates AWS services in a local environment. This enables developers to build and test various AWS-based solutions on a small scale without requiring an AWS account.
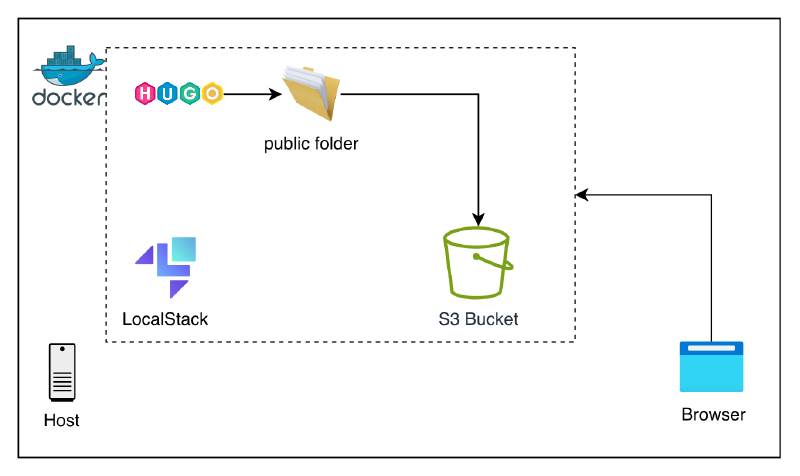
In this post, LocalStack is used to test the deployment of a static website to a S3 bucket. Hugo, a popular static site generator, is used to build the site. The following topics are covered in more detail throughout this post:
- Creating a containerized environment that includes:
- LocalStack
- Hugo
- S3 bucket creation and configuration for static website hosting
- Building and deploying the static site to the S3 bucket
- Automating the deployment process
The entire source code and setup is available on GitHub.
This post does not cover the inner workings of Hugo or how to set up a Hugo static site. Instead, it focuses solely on the deployment aspect. Hugo themes can be found here.
Setup of the Containerized Environment
LocalStack provides a pre-built Docker image that’s available on Docker Hub, offering a fully functional local AWS cloud stack in a containerized environment. However, the image doesn’t include any Hugo-related dependencies to build a static website. For that, we will create a new image based on the LocalStack image and include the additional dependencies.
The Dockerfile below implements the initial basic setup:
| |
Details for installing Hugo can be found from the official documentation
We can then build the image once the Dockerfile is set up by using the command:
| |
Finally, we can run the container by using the command:
| |
./hugo-blogcan be an empty directory, in which Hugo can be set up within the container, or it can be a directory that already contains a Hugo website.
Accessing the container can be done by opening a new terminal and executing the following command:
| |
At this point, we have a running localstack-gohugo container that has the following built-in dependencies set up:
- LocalStack
- Hugo and its dependencies
However, we do not yet have the actual final build of the website or any deployable, site-related output. In the next sections, we will walk through the deployment process within the container to better understand how the manual process works. Afterward, we will demonstrate a better and enhanced automated way to perform the deployment.
S3 Bucket Setup
Two simple steps are needed to set up the S3 bucket:
- Create the bucket
- Apply a bucket policy to allow public access
Bucket creation in LocalStack is done using the command below:
| |
awslocalis used instead ofawsfor all AWS-related APIs when using LocalStack.
Once the bucket has been created, a policy has to be set and applied to the bucket so that the website can be publicly accessible. Therefore, the following bucket policy will be set:
| |
The bucket IAM policy allows anyone ("Principal": "*") to get read-only access ("Action": "s3:GetObject") to the
website contents on the S3 bucket ("Resource": "arn:aws:s3:::testwebsite/*").
The official AWS Documentation contains more thorough details regarding the attributes.
Lastly, the policy is applied to the bucket by using the following command:
| |
Deploying to S3
Several steps are required before we can deploy to our S3 bucket, namely:
- Properly set up the
hugo.tomlconfiguration file - Build the static site using Hugo:
hugo --gc --minify - Deploy the site to the S3-bucket:
awslocal s3 sync ./ s3://testwebsite
Configuring hugo.toml
The
hugo.tomlconfig file is already properly set when building the image; however, this section explains how to set the configuration file.
The configuration file is human-readable, and we only need to set four parameters to get started. With LocalStack, the
S3 website endpoint accepts several formats; the most common is the virtual-hosted style:
http://<BUCKET_NAME>.s3-website.localhost.localstack.cloud:4566. Hence, the configuration file looks as follows:
| |
It’s possible to set a section for
deployments; however, it doesn’t seem to be well integrated with LocalStack, so this will be skipped for the time being.
Building the Website
A single command is needed to build the website:
| |
A single command is needed to build the website:
| |
Hugo will process all the Markdown content files and templates, generating a complete, hostable website in the public
directory. The source files (Markdown, partials, etc.) will be converted into HTML/CSS/JS, which will be stored in the
public directory. For better visualization, the structure of the public folder is presented below:
| |
For additional details, check Hugo’s official documentation.
Once the website has been built and all the content is generated, the index page has to be set using the command:
| |
Deploying to S3 Bucket
Deploying to the S3 bucket simply means uploading the public directory to the bucket. This can be achieved using the
s3 sync command as follows:
| |
The site is now hosted on the S3 bucket testwebsite. To test, simply open the browser and paste the base
URL: http://testwebsite.s3-website.localhost.localstack.cloud:4566.
It might not work on Chrome, Firefox, or other Chromium-based browsers. Edit the
/etc/hostsfile on your machine and add the line127.0.0.1 testwebsite.s3-website.localhost.localstack.cloudfor it to work. For more info, check the resolved GitHub issue.
Further Automation
To reduce the setup, a helper script was implemented and the Dockerfile was adjusted as follows:
| |
Below is a brief overview of the updated Dockerfile:
- Copy the entire working directory into the container so that we can avoid using the
-vmount option. - Set the script to executable and move it to
/etc/localstack/init/ready.d/init-aws.shso that it is automatically executed by LocalStack once the container is running.
Check the LocalStack initialization hooks for more info regarding the lifecycle.
With the newly enhanced and improved Dockerfile, the container is ready to use out of the box, without the
need to perform any manual tasks.
Setup Script
Below is the implemented script for automating the setup within the container:
| |
The script above handles:
- Creation of the bucket.
- Applying the
bucket_policy.jsonfile. - Building the website using
hugoand generating thepublicfolder. - Syncing the
publicfolder to the S3 bucket. - Setting the
index-documentfor the bucket.
Once the image is built and the container is running, we can directly access the website at the following endpoint: http://testwebsite.s3-website.localhost.localstack.cloud:4566
Don’t forget to update the
/etc/hostsfile to add the line127.0.0.1 testwebsite.s3-website.localhost.localstack.cloudfor it to work.
Conclusion
The setup explored in this post is mainly for local development and emulating a production-like environment. In short, we’ve managed to:
- Extend the LocalStack container image to integrate Hugo and other dependencies.
- Implement a script to automate the setup inside the container by performing the following tasks:
- S3 bucket creation and configuration
- Building and deploying the site to the created S3 bucket
The complete source code used here can be found here on GitHub.